Tuesday, July 11, 2017

We Flamingo Together

Hello and welcome to my blog! I made this card for my Anniversary and for the Lawn Fawn Challenge!


Even though the Flamingo together stamp and die set came out a long time ago I just bought it last weekend.  I have wanted it for a while but I just had not had the chance to buy it before.  So of course I wanted to use it right away.  It had a romantic sentiment and what says summer like flamingos so it worked for both the challenge and my anniversary card too!  Bonus!  I got out the stamp and die set, my memento ink pad, my shammie, some white cardstock and my acrylic block.


I stamped my images.
I decided to use just the flamingos so I colored them with my Zig real brush markers.

Then I got to work on the background of the card.  I knew I wanted to use the Lawn Fawn heart dies and watercolor paper in my background for sure.  I also decided to use the fancy scalloped rectangle dies too.


For the heart I selected one of my free papers I had been sent with a shipment of stamps and dies from Lawn Fawn!!!  I always look forward to the free paper and stamps with each shipment!  And I used an orange cardstock that matched the beaks of my flamingos.
I cut out my hearts, rectangle and my flamingos with my cuddlebug and my magnetic plate!  No more washi to hold dies down anymore!!!


Next it was time to stamp my sentiment to the bottom of my card.
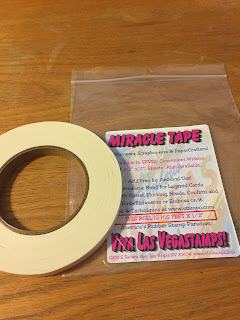
Then I played around with my hearts and flamingos until I liked what I saw.  I attached my hearts with miracle tape and my flamingos with pop dots.


Now I have this cute card to give my husband on our upcoming 11th wedding anniversary!  Where did the time go???  Anyway I hope you enjoyed this card tutorial today!  Come back soon to see more!  Below you will find a supply list and a plug for my local scrapbook store.  You can but most of the supplies I used here today from them and many more unique papercrafting supplies the big box stores do not carry.

Supply List
A2 card base and envelope
American crafts white (smooth) and orange cardstock
Pop dots
Miracle tape
Cuddlebug- magnetic plate, A plate, 2-B plates
Zig real brush markers
Memento ink
Acrylic block
Lawn Fawn shammie
Lawn Fawn flamingo together stamp and die sets
Lawn Fawn fancy scalloped rectangles
Lawn fawn watercolor paper blue
Lawn Fawn heart paper green
Lawn Fawn heart dies


I am not an affiliate of my local scrapbook store but I love it!  It
gives me my sanity and I consider it my second home!  So I have to put
in a plug for my favorite scrapbook store!  As we all know many of our
local scrapbook stores are an endangered species.  So if you happen to
be in town or want to order online please do!  There are so many unique
products available.  I would truly appreciate you supporting my cropping
haven!

   
  https://www.scrappininthecity.com/

Make a Wish-Stars

Hello and welcome to my blog!  Today I'm going to share a card I made for my Mom's Birthday. 
I'm pretty excited about this card and can't wait to give it to my Mom!!!  I decided to use the Lawn Fawn stamp and die set upon a star.
I got out my stamps and dies, my memento ink, shammie and acrylic block.  Then I stamped my images.


Next I colored in my images with my Zig real brush markers.
I decided to only use the one large bunny and stars from what I had stamped.  Next I cut my dies lose with my wire cutters.  The newer Lawn Fawn dies require very skinny nosed wire cutters (just a warning).
I ran my images through the cuddlebug with the help of the new magnetic plate!  no more need for washi!!!!

So easy and so use!!!
Next to make my night sky.  I picked out some Tim Holtz distressed mini inks I thought would make a great sky.  Than I practiced on some scratch paper using my blending tools.  The colors worked so I did it on a piece of cardstock I had cut to size for my card base.
Next I cut out a piece of black cardstock using the stitched hillsides dies.  I attached it, with miracle tape, to the background I had made with ink on my white cardstock and used my Tim Holtz scissors to cut it down to size.


When this was done I was ready to add the constellations.  I used my Hero Arts-hero hues white stamp pad to add the constellations.


Next I added the bunny and the small stars using Tombo aqua liquid adhesive.  Then I added the big stars using pop dots.

Finally I used Miracle tape to attach my card to the A2 card base and I had this cute card for my Mom's birthday!  Thanks for coming and reading my tutorial today!  I hope you enjoyed it!!!  Below you will find my supply list and a plug for my local scrapbook store where you will find most of the items I used today and many other unique papercrafting supplies you can't find in the big box stores.

Supply list
A2 card base
Fiskars trimmer
Tim Holtz large scissors
Thin nosed wire cutters
Cuttlebug-A plate, magnetic plate, 2-B plates
American Crafts white (smooth) and black cardstock
Lawn Fawn shammie
Lawn Fawn Upon a star stamp and die sets
Lawn Fawn hillside borders die
Tim Holtz distressed mini inks
Hero Arts-hero hues white ink
Zig real brush markers
Miracle tape
Pop dots
Tombo aqua liquid adhesive

I am not an affiliate of my local scrapbook store but I love it!  It
gives me my sanity and I consider it my second home!  So I have to put
in a plug for my favorite scrapbook store!  As we all know many of our
local scrapbook stores are an endangered species.  So if you happen to
be in town or want to order online please do!  There are so many unique
products available.  I would truly appreciate you supporting my cropping
haven!

   
  https://www.scrappininthecity.com/